E5. Connected devices🔗
In brief🔗
This screen manages your POS's multi-device setup: it shows the connection state, lets you connect new devices (PDA, kiosk, shared screen), handle pairing requests, manage already linked devices, and run a diagnostic. This is where pairing happens.
For whom / when🔗
For the manager who wants to add a server tablet, a kiosk, or a shared screen, authorize a new device, or block a device that should no longer access the POS.
How to get there🔗
System → Multi-devices
Prerequisites🔗
🔑 Manage settings
Screen tour🔗
The Refresh button is at the top right. The screen offers 4 views as tabs.
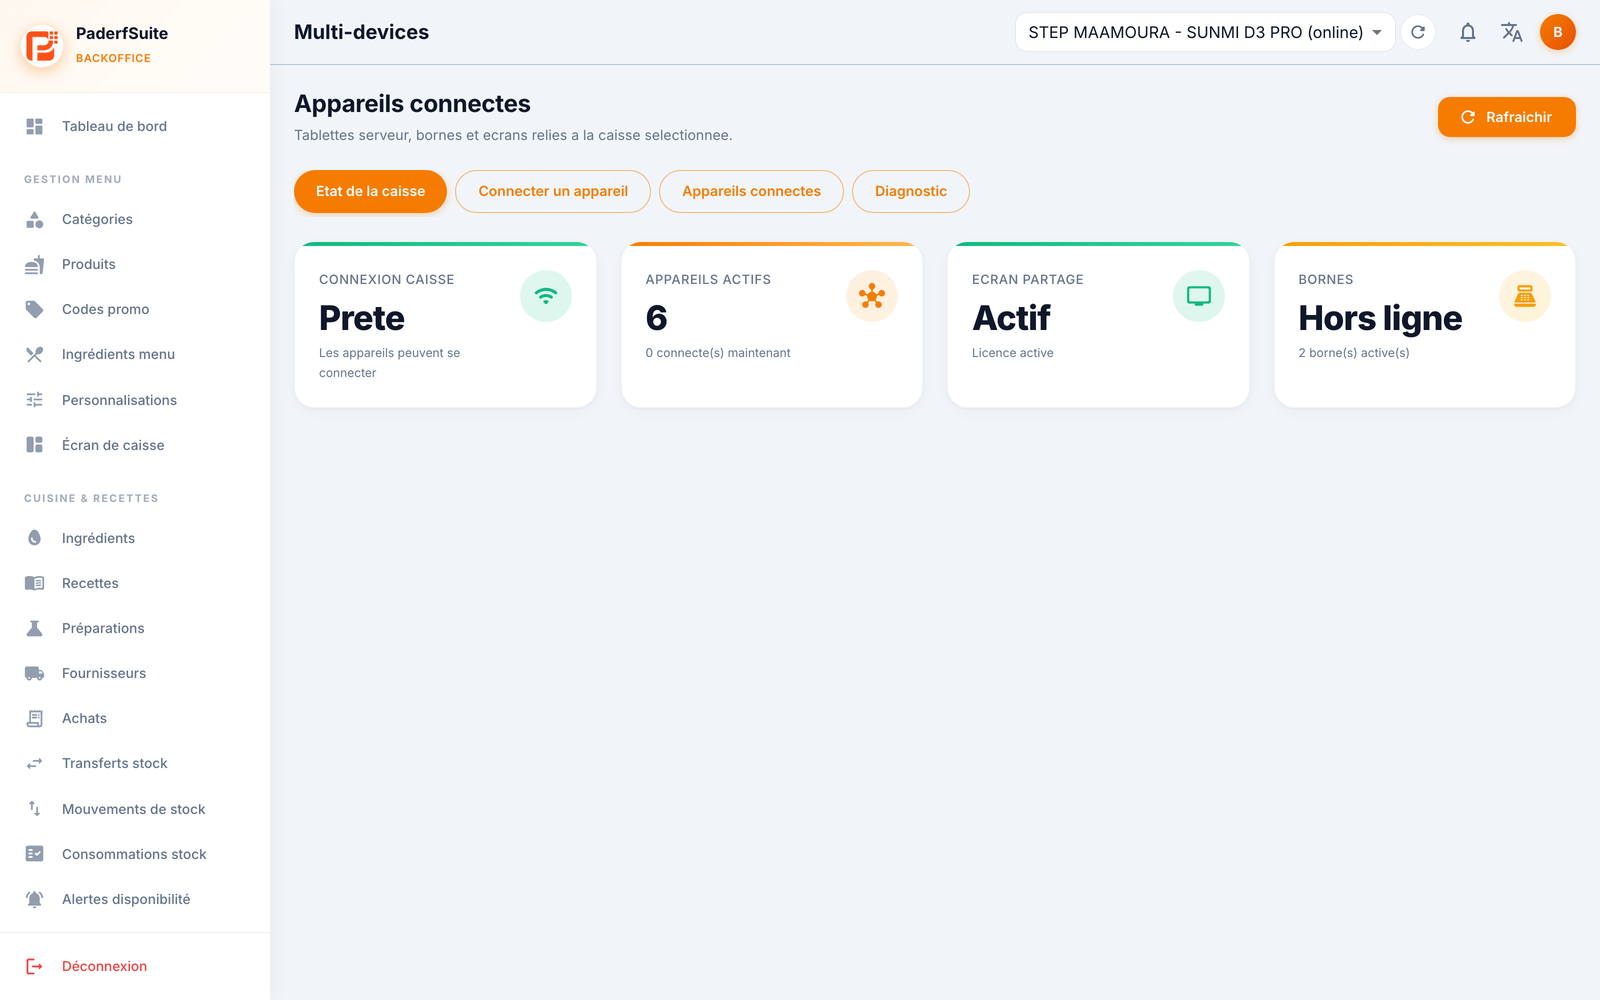
POS status tab🔗
Four indicators summarize the situation:
- POS connection: for example Ready (devices can connect).
- Active devices: the number of linked devices and the number currently connected.
- Shared screen: its state (for example Active, license active).
- Kiosks: their state (for example Offline, number of active kiosks).
Connect a device tab🔗
- QR / pairing code to link a PDA, a Kiosk, or a Shared screen, with a TLS PIN.
- Pairing requests to authorize or decline.
- Shared screen settings: connection via PIN or NFC, session duration, demo mode.
- Link to the Kiosk settings.
Connected devices tab🔗
A table of the linked devices, with the columns: device, type, state, last activity, assigned user, version, and the block or delete actions.
Diagnostic tab🔗
- Address of the POS.
- TLS PIN.
- Code validity of the pairing code.
Step-by-step procedures🔗
Connect a new device🔗
- Open the Connect a device tab.
- Choose the type (PDA, Kiosk, or Shared screen).
- On the device, scan the QR or enter the pairing code and the TLS PIN.
- Confirm. The device sends a pairing request.
Authorize or decline a request🔗
- In Connect a device, locate the incoming pairing request.
- Click Authorize to link the device, or Decline to reject it.
Configure the shared screen🔗
- On the Connect a device tab, in the Shared screen settings section.
- Choose the connection (PIN or NFC), the session duration, and the demo mode if needed.
Block or delete a device🔗
- Open the Connected devices tab.
- On the relevant row, choose Block (deny access) or Delete.
- Confirm in the dialog.
Diagnose the connection🔗
- Open the Diagnostic tab.
- Check the POS address, the TLS PIN, and the code validity.
Messages & edge cases🔗
- The number of devices you can link depends on your license limits (PDAs, kiosks, screens): see E2. Licenses & modules.
- A pairing request must be authorized from this screen for the device to access the POS.
- Blocking a device prevents it from accessing the POS without removing it; Deleting removes it permanently.
Tips🔗
- In case of a connection problem, the Diagnostic tab immediately gives the address and TLS PIN to check.
- To check the hardware state of the devices (printers, drawer…), refer to E4. Devices.